

Sharing your music with media sites, radio stations and podcasts?
These tips (and free software) will help you spread the word about your music AND make sure you provide the best formatting (and proper form) to stand out above the rest.

Intro:
We get an avalanche of albums/singles/EPs sent to the Disciples of the Watch every year, and there’s one thing that’s consistent: inconsistency.
To best represent your band, use the following tips to make sure your files don’t get lost in the shuffle when submitting for press or airplay.
TAG! YOU’RE IT!
So, you’ve taken all of this time to craft your music, spent money and time recording, so why not take the proper steps to present your music properly, and effectively?
First, find a useful music file tagging software. One I’d recommend and use (and contributed to!) is MP3tag: https://www.mp3tag.de/ (ENG/Deutsch). Even if you use different software than what I use, the information below is still relatable to properly naming your music files.
I won’t bore you with all of the cool functionality of the software – head over to the site to see all of that.
Here’s a sample of MP3tag in action:
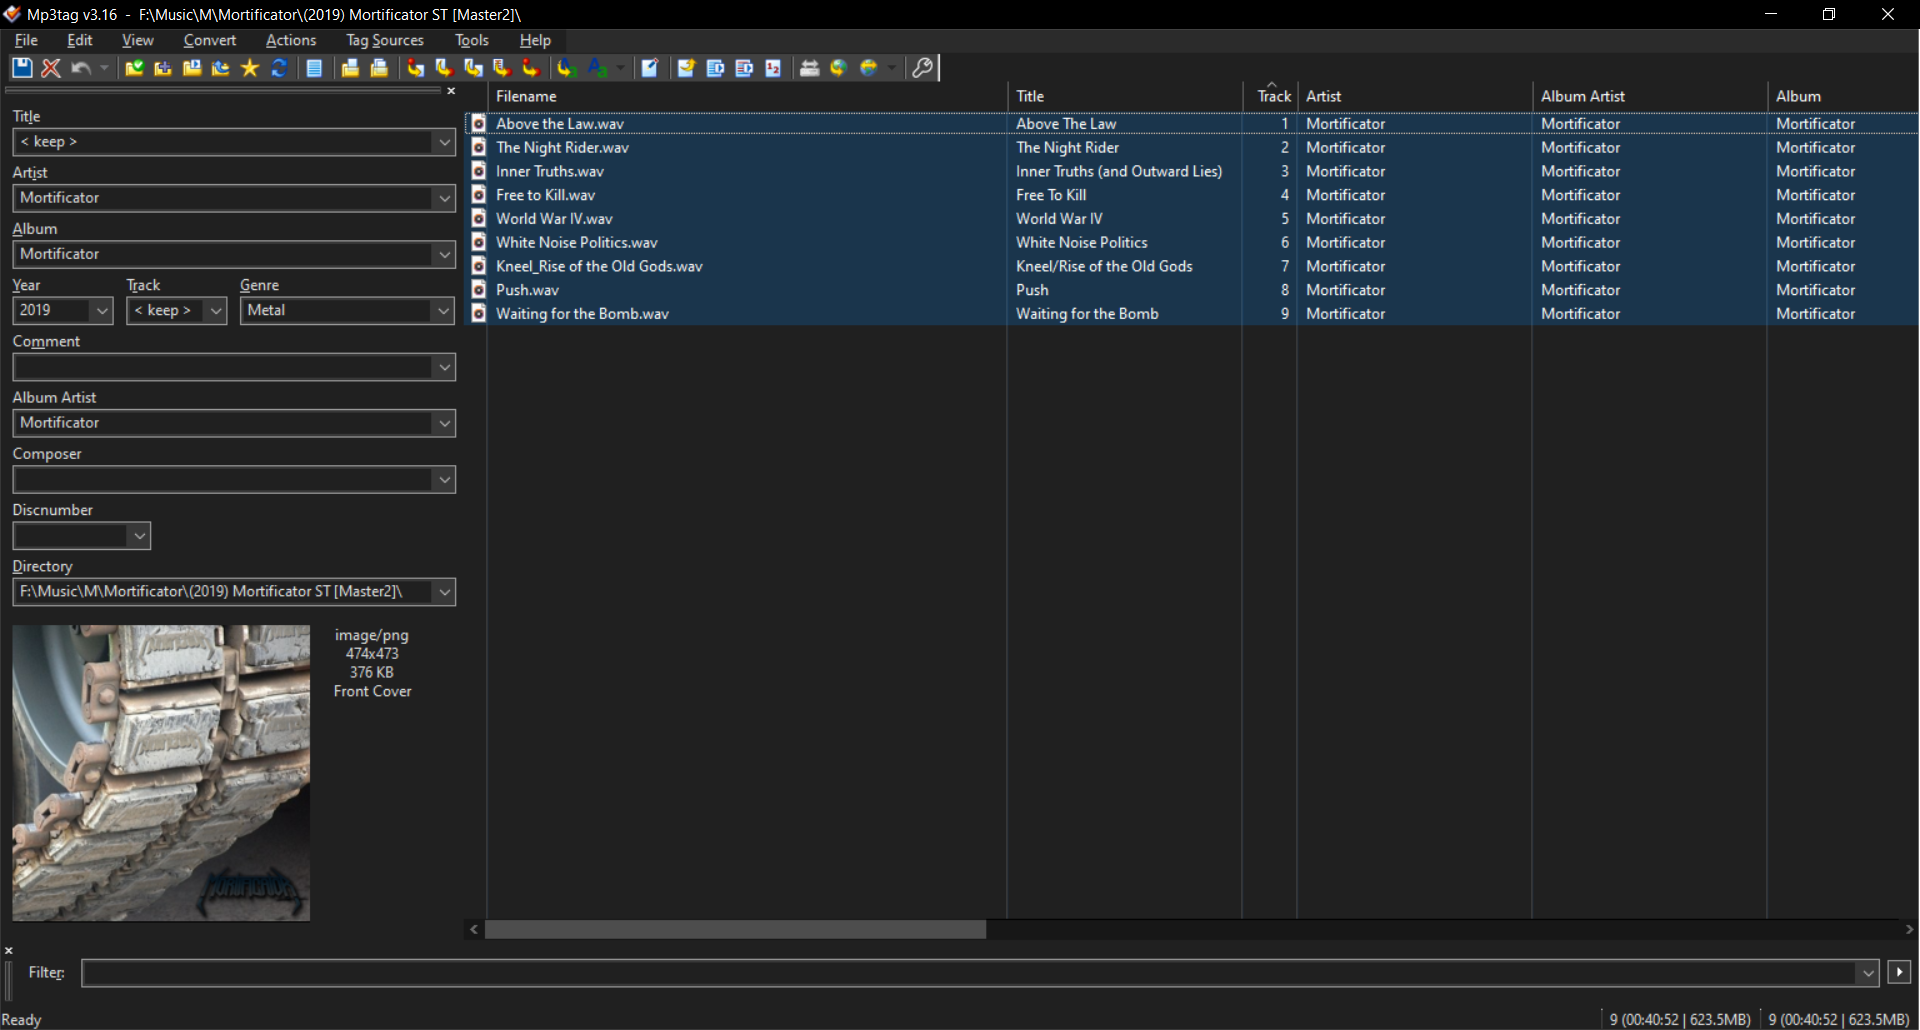
As you can see, I presented the all of the information in a proper category. Remember, spelling is important! 😉 Also, DON’T USE ALL CAPS! IT DOES NOT MAKE YOUR BAND STAND OUT! It actually has the reverse affect. You’re trying to clutter up a catalog of a podcast/radio station, or making the person cataloging the collection do MORE WORK to correct your mistake.
Here’s how I recommend you present the files, starting with the left-hand side of the software. Note for MP3tag users: if you have all of the files selected on the right, you can easily modify all of the files at once with information that will repeat for all of the files. This also goes for ALBUM, YEAR, GENRE, ALBUM ARTIST, COMPOSER, etc. See below for proper presentation of this information.
Areas with an asterisk (*) are primary focus areas, and we start with the section on the left:
- *TITLE – Just the name of the song, No ‘track number’, no ‘band name’, no ‘album name’. It’s simply the title of the song! The tags below cover all of this information, and your cluttering it up with useless information is pointless. It also forces the person cataloging it to REMOVE this useless information. Keep it clean.
Additional information can help in searching:
[cover] If it’s a cover, tag it so it can be found, then include the original artist using the ‘artist tag’ below. This one is most important.
[acoustic] if it’s an acoustic rendition of another song, add this tag.
[remix] self-explanatory
[remaster] again, self-explanatory - *ARTIST – This is tricky sometimes, but it’s as easy as this: Is the release of various artists? (Compilations, samplers, movie soundtracks, etc.) The list ‘Various Artists’ here. If it’s just one artist, then use that. (In the example above, it’s ‘Mortificator’. Also, if your song ‘features’ another artist, add them after your name using an semicolon (;), like so: Mortificator; Bobby Ellsworth. This allows the artist to be shown in their own listing in a catalog, but still tied to your song/release. This is especially important if it’s a cover song so you can show up when someone is searching/sorting an artist (ex: Iron Maiden).
- *ALBUM – The title of the album. That’s it. No band name, no ‘release date’, no ‘record label’. (Add that information to the comments.)
- *YEAR – the actual year of release. Just the year. No month, day, etc. That’s information you can use on your press release, website, Encyclopedia Metallum, etc. If you REALLY think it’s important to include day/month information, include that in the ‘comment’ section below.
- *TRACK – Track number. Feel free to use ‘zeros’: 01, 02, etc. That can help with certain programs being able to sort properly, so when it gets to the ‘tens and teens’ (10, 11, 12) it doesn’t throw the sorting off. Most programs don’t have this issue, so it you list 1,2,3 instead – no biggie.
- *GENRE – Another over-looked tag. This is important, as it helps podcast/radio programs to find genre-specific bands.
I tend to tag with ‘Primary Genre, Sub-Genre’ for detailed sorting/searching:
Metal, Thrash
Metal, Black
Rock, Hard
Rock, Punk
- *YEAR – the actual year of release. Just the year. No month, day, etc. That’s information you can use on your press release, website, Encyclopedia Metallum, etc. If you REALLY think it’s important to include day/month information, include that in the ‘comment’ section below.
- COMMENT – this is an optional field. Put the name of your record label, website, etc. You can also add specific date of release information here.
- COMPOSER – you can list yourself, or whoever composed the track in this field. This is another that’s not mandatory, but can provide useful information.
- *ALBUM ARTIST: For non ‘various artist’ releases, just repeat the name of the artist so it’s not blank in a catalog (and therefore findable in AA sorting while searching a catalog). If this is a ‘various artist’ release, use this field to add the name of the artist. Again, if it’s a ‘featuring’ song, include that person using the instructions in the ‘ARTIST’ section above.
- DISCNUMBER – If you’re modifying the files of a multi-disc release, then this is useful. Otherwise, feel free to skip it.
- *ALBUM ART – again, with all of the files selected on the right, you can add your pretty album art to ALL of the files here! That way, when the file is being played – your art is being presented in the player!
If you’re using MP3tag, you can add all sorts of other art and tag it as ‘band photo’, ‘logo’, ‘back cover’, etc. by right-clicking on the art and tagging the photo as such. - Other things to consider:
The FILE NAME is simple, and presenting the track number/title isn’t a bad idea. Some people cram everything into a file name, but if you properly tag the files, that won’t be necessary, and keeps things clean.
**MP3tag users: Any modifications made while in the right-hand side of the software will automatically save for you when you move between the fields.**
If you find yourself using the software quite a bit, please consider contributing to the creator! (And yes, I have put my money where my mouth is!) https://www.mp3tag.de/en/donations.html
ZIPPITY-DO-DIS!
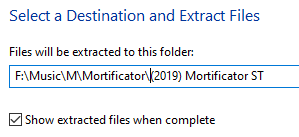
First, file name. When zipping your files, make sure the first thing listed is your BAND NAME, then follow-up with the release year, then the album name:

In this case, the release is a ‘Self-Titled’ release, hence the repeating of the name and the ‘ST’ presented afterwards. This makes it easier to properly identify the album AND the release, and after unzipping, presenting the release in the chronological order:
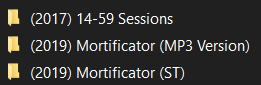
Some record labels will add their name to the end of the file, and possible release date. That’s great and provides useful information ‘at a glance’. I usually remove that information when I unzip a file, but I also have a record in a spreadsheet to track the necessary information.
YOUR MUSIC IS IMPORTANT!
Make sure you are providing all of the proper details when you are emailing out your files (or posting them in Dropbox, Google Drive, etc.) You can also create an ‘EPK’ – Electronic Press Kit – to accompany your music in the zip file.
Documents/PDFs with pertinent information, extra album art files, band photos, etc. It’s also helpful should someone share the files with a co-host so they have all of the information that they may desire when researching/discovering an artist.
Submit your Rock/Metal band at music@dotwpod.com today!
Stay safe, and stay heavy!
– Gene
